You should read this section if you would like to install TFLA-01 on your system and get it working. Don't ask me any questions per E-Mail if you didn't read this chapter of the documentation completely!
Packages for openSUSE and SUSE Linux Enterprise 10 can be obtained in the openSUSE BuildService.
Start the logic analyzer via command line by running
$ tfla-01
or add a shortcut to your desktop's start menu. In /usr/share/pixmaps
you find some icons which you can use for that.
On the webpage, the author provides binaries for TFLA-01 for (32 bit) Windows as a ZIP archive. Just extract that archive to some directory and you're done. Don't forget to install the giveio software as described in Windows 2000/XP permissions. After that, just start TFLA-01 by double-clicking on the program icon.
If the system complains about missing libraries, you have to install the Microsoft Visual C++ 2008 Redistributable Package. Just enter that term in a search engine of your choice and you'll find the download site at Microsoft. Since the links that Microsoft provides are not “stable”, I didn't want to include the direct link in that documentation. Ensure that the language is identical to your Windows installation, and then download and install that software. After that software is installed, try again.
The normal way to install TFLA-01 on Unix is to compile the source code since it is impossible for me to provide binaries for all various plattforms. If you've built a binary (preferrable a package) for your favourite Unix flavour and you plan to maintain it for future TFLA-01 releases, just drop me a note and I'll put a link on the TFLA-01 homepage or upload the binary. The users will thank you!
However, compiling TFLA-01 is not difficult since the dependencies are small. Building on Microsoft Windows is different, so this chapter only describes the build procedure on Unix. At first, make sure that you have following software installed and that the preconditions are met:
gcc or another C++ compiler
Qt 4.5 including the developement package. Verify this by running
qmakeon command line.libieee1284 including the developement package (which includes the header files).
CMake to build the software.
Docbook to build the documentation which is done during the build process.
To make things easier, the following table shows the packages that you need to install on common Linux distributions. If your distribution is not listed and you know how to fill the table, don't hesitate to contact the author.
Table 1. Dependency packages on different distributions
| Distribution | Packages |
|---|---|
| openSUSE |
qt-devel
libieee1284
cmake
docbook-xsl-stylesheets
gcc-c++
libpng-devel
libpng
freetype2-devel
libxslt
|
| Ubuntu |
cmake
g++
libqt4-dev
libieee1284-3-dev
xsltproc
docbook-xml
docbook-xsl
|
| Fedora |
cmake
gcc-c++
qt-devel
libxslt
docbook-style-xsl
libieee1284-devel
|
Now after everything is right, just build the software now with following commands:
$ mkdir build$ cd build $ cmake ..
$ make

|
Since it's usual to build the binaries in another directory than the source
directory with CMake, we create a |
|
With the call to cmake, the build system is configured.
Please refer to the documentation of CMake for advanced options. The most
important option is |
|
Now after the |
To install the software, just run
$ sudo make install
That's it! Please don't forget to read the Permissions section.
Using CMake, it's possible to build the program with Microsoft Visual Studio
(the free “Express Edition”). The sources of the libieee1284 that
are included in the TFLA-01 distribution can be used for that. That subdirectory
includes an own CMakeLists.txt file that should be used to build
the library. Then the library path for libieee1284 can be set to that subdirectory.
Because you want to run the application as normal user and not only as administrator, you have to deal with permissions of the operating system. This depends really on the system (i. e. there are differences between Unix flavours and even Windows versions) and does not depend whether you compile the program by hand or use a binary to install, so I made an extra section.
On recent Linux versions (Kernel 2.4 and higher), the applications uses internally
the ppdev kernel module. It should be loaded automatically.
If not, use
# modprobe ppdev
to load the module once. On SUSE, you can add the module to
MODULES_LOADED_ON_BOOT variable in
/etc/sysconfig/kernel. On Debian and Ubuntu, the string ppdev
can be added to /etc/modules if the ppdev is not
loaded automatically.
The other thing you have to make sure is that the user which runs the TFLA-01
program has read and write permissions to the /dev/paraportX
device file where X means the number of the parallel port you
want to access.
On Ubuntu, the file /dev/paraportX is owned by the lp group.
So all you have to do is to add your user to that group:
# adduser USERNAME lp
Don't forget to re-login so that that change applies.
If the device /dev/parportX is owned by root, the classical
approach is to create a group parport, set
the owning group of the parallel port device to parport, change
the parallel port to crw-rw---- and add the users to the group
as necessary. Read the manual of your Linux distribution for details. Since the
device files are normally created by udev in a modern
distribution, you have to add a file
/etc/udev/rules.d/90-parport.rules that
contains
KERNEL="parport[0-9]", MODE="664", GROUP="parport"
It's also possible to add this to an existing rules files, but that's problematic for updates. Creating a new file is the cleaner approach. The number determines the order in which the files are used -- for the parallel port, that doesn't matter. Add all users that should have permission to use the parallel port to that group. You have to log out and log in again to apply this.
If you want to run it in user mode you need to use the giveio driver that is supplied with avrdude. The installation of giveio is described in the documentation of avrdude.
A schematic in Eagle and PDF
format is distributed with the program. In source Tarball, you find the schematic
in doc/schematic and it gets installed in
PREFIX/share/doc/schematic on any plattform. You can also view
it online.
It should be easy for you to get and solder the components. The components are
cheap and should be available at any electronic part store. In Germany, for example
at Reichelt [1]. If anything is unclear,
feel free to send me an email at <bernhard@bwalle.de> and hope to get
a reply. If anyone made a board layout (preferrable with
Eagle, too) it would be nice if you could
sent it to me so that I can it include in the TFLA-01 distribution or just link
on the TFLA-01 homepage.
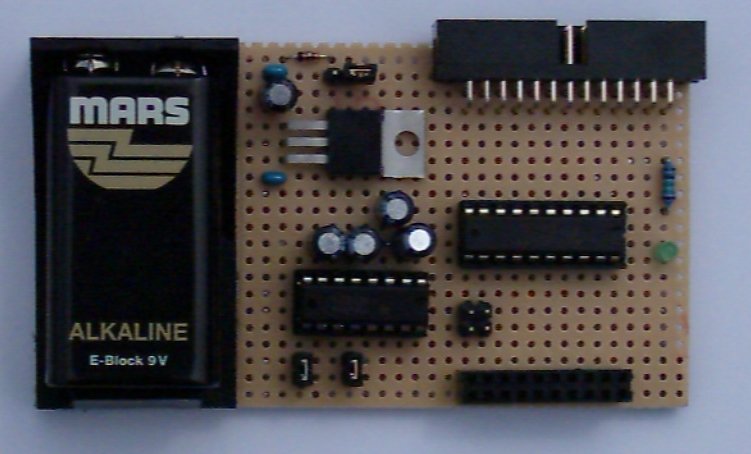
To connect it to the parallel port of the PC, you have to solder a small adapter because of the different connectors. You can also use a SUB-D plug on the board and a standard cable.
After you installed the program and built the hardware, it's time to test it.
Insert a battery in the logic analyzer and power it on by connecting the
JP-POWER jumper. A green LED should show that the power supply works.
Now use a wire to connect pin 9 and 8 of the ANALYZE jack. Start
the TFLA-01 application by typing tfla-01 on Unix or by double-clicking
the TFLA-01 icon in the Windows explorer.
After the TFLA-01 window appears, choose a parallel port in the + menu. All other default settings should work, so just click on the Start icon, use the → menu item or press F5. You should see something like the screenshot below:
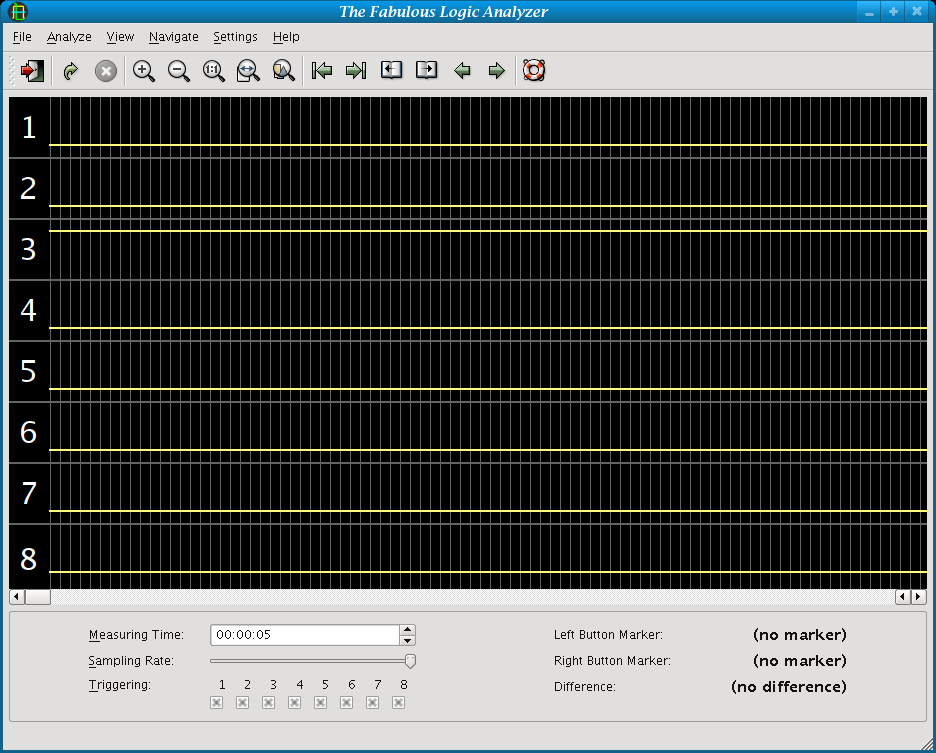
Because there's no changing signal, you see nothing special. The pin 8 is connected to GND while all other pins are unused which means high level here. The grid on the screen represents the samples. Just before the line is drawn the application displays the number of collected samples in the status line. This may give you a hint how fast your parallel port is. You can work out the sample frequency now, it's 1/(number of samples).
Congratulation, your logic analyzer is working. Play a bit now and come back to this documentation to discover all features of the software (which are, of couse, not very much).